Thursday, August 08, 2013

100 things to do this summer...

Summer is half over - when did that happen????

Last summer we made a list of 100 things we wanted to do.  It was a big hit!  It gave us things to look forward to and gave us ideas on days we were bored.  We pretty much checked off all of our list, with a few alterations along the way.  This is our list for this summer:


1 Make ice cream
2 Bike to playground under Cambie Bridge
3 Bike to firetruck playground
4 Bike around Stanley Park
5 Outdoor pool - Second Beach
6 Outdoor pool - Kits
7 Outdoor pool - Maple Grove
8 Outdoor pool - New Brighton
9 Thrift store
10 Thrift store
11 Tie Dye
12 Casa Gelato
13 Geo Caching
14 Geo Caching
15 Geo Caching
16 Geo Caching
17 Geo Caching
18 Geo Caching
19 Geo Caching
20 Geo Caching
21 Geo Caching
22 Geo Caching
23 Catch crabs for dinner
24 Pick huckleberries
25 Pick blackberries
26 Pick raspberries
27 Pick strawberries
28 Pick blueberries
29 Pick tayberries
30 Waterpark
31 Stop an icecream truck
32 Make a pinata for courtyard kids
33 Find a photobooth
34 Penny toss adventure/walk
35 Girls/boys night out
36 Folk Fest!
37 Get slurpees
38 Dog Park/Beach
39 Dog Park/Beach
40 Dog Park/Beach
41 Dog Park/Beach
42 Dog Park/Beach
43 Dog Park/Beach
44 Dog Park/Beach
45 Dog Park/Beach
46 Dog Park/Beach
47 Dog Park/Beach
48 Dim Sum!
49 Fish & Chips
50 Fly kites
51 Make slime
52 Play soccer
53 Farmer's Market
54 Farmer's Market
55 Farmer's Market
56 Farmer's Market
57 Farmer's Market
58 Make marshmallows
59 Go camping
60 Go camping
61 Go camping
62 Bellingham
63 Trader Joe's
64 Lego Store!
65 Dance in the rain
66 Make seed bombs
67 Build a beach fort
68 Make lego crayons
69 Make cupcakes
70 Fireworks
71 Chinese Garden
72 Make candy
73 Candy store
74 Japanese candy store
75 Daiso shopping
76 Swim in a lake
77 Swim in the ocean
78 Swim in a river
79 Watergun fight
80 Waterballoon fight
81 Make spongeballs for waterfight
82 Pajama day - movies and popcorn
83 Make a sand castle
84 Blow bubbles
85 Explore tidepools
86 Hike up a mountain
87 Screenprint/stamp session
88 Chalk drawings
89 Decorate snails
90 Bunny park
91 Minigolf
92 Feed ducks/swans
93 Sprinklers!
94 Drive-in movie or outside movie
95 Indoor movie
96 Go to camp - Miss B
97 Go to camp - Mr. Mister
98 Tag in the dark
99 Eat outside on the deck
100 HAVE FUN!!!!!!

We have the list printed out and we put stickers on each of the items we have completed.  We are at about 50% right now.  Only 26 days until school starts - but technically summer goes until September 21, right?  We still have time to finish our list.


How is your summer going?


Musings

I seem to have been absent for a bit, again.  I kind of lost my motivation with the month of craftiness.  I feel bad when I can't keep up; when life takes over and I can't finish the things I hoped to complete.  When I'm not perfect, I freeze.

Around the same time of this guilt/panic attack, I attended a night of motivational speakers with a dear friend of mine.  The series is called Sparkfly. The evenings entail two creative Vancouver women telling their inspirational stories to an intimate group of gals.  It was held at the now closed Little Nest.  We settled into listening to the first lady but I found her catch phrases really hard to relate to - I wasn't inspired.  Yummy pastries and tea were served in-between speakers and we each decorated a stone with words/drawings to share with another attendee.  The second speaker came up and sat down with us.  She really touched my heart.  Her personal stories made sense to me and I took away this from her musings: you have something unique and special to share with the world and no one can tell you how to do that.  Did you hear that? NO ONE can tell you how to be you.  Hallelujah!  Why was I stressing about the list of homemade things I needed to do just because someone made up a list?  The list is meant to be inspirational, but why do I have to do them when they tell me to?  I've never really been a follow-the-rules kind of person anyway, so why should I do it now?

This realization made me think about my blog.  Despite the fact that I love blogs that post regularly, I have decided that on this blog you may never see a regular feature - no Throw back Thursday, no Wordless Wednesdays.  I'll post here and there when I document something that I did that I think is pretty cool.  It won't be everyday.  Hopefully it will be at least once a week.  When I am inspired, you will hear from me.  And this is okay!

Am I doing this blog to become famous?  Certainly not.  I want to document and share the things we do at home and share them with friends.  I do hope to make a few new friends who have similar interests, and it is already happening!

Oh, and the inspirational stone we were to choose from the bowl on our way out the door?  This is the one that landed in my hand:


Fail gloriously.

Yes indeed.  I failed gloriously and I am picking myself up off the floor and I will start again. And again.  And again.

I'm currently healing from a nasty fall about eight weeks ago that left me with a dislocated shoulder, but I am getting back to my regular activities.  I can still knit.  Sewing isn't easy, but I am drawn to it again as the piles of clutter in my house are being put back in order.  Summer is half over and school will be starting again.  This fall I will have two kids in school full time.  This will leave me with six hours everyday that I can devote to the things I love to do that I haven't had time to do.  I might even look for work that can be done during school hours.  Lots of change is on the horizon.

Sunday, June 02, 2013

2. In Your Home

Sew Caroline's Handmade Summer

2. In Your Home

For my birthday, my lovely cousin-in-law gave me a pot of gorgeous succulents.  She said they could be outside, so I put them on my deck.  This was a mistake because all the little local birds ate them!!!  Little buggers....  There were two plants that made it out alive, but with a few beak marks.  They looked sad in the planter all alone so I thought I should replant them - and bring them inside so that the birds don't snack on them.

I had some coffee cups from Ikea that I was going to re-home, but they came in handy for my little succulents.  I separated the remaining plants into six little bunches.  I put about an inch of gravel in the bottoms of the cup in case that I overwater, which I tend to do.  Then I planted the little succulents.  Easy Peasy.  And very cute all in a row on my windowsill.


Join us for a handmande summer!

1. An Accessory

Sew Caroline's Handmade Summer

June 1.  An Accessory

Have you ever seen these hair elastics at your local teenage-trendy store?  They are usually about $10 for four or five.  Seriously.  $10.  For their leftover underwear elastic tied in a knot.  Obscene.

I was given one at Christmas and fell in love.  They are soft and don't catch and pull your hair.  I needed more so I searched out some more in stores and was blown away by the cost.  As usual, my brain says, "I can make these."  So I did.

I searched through my stash and found some underwear elastic from a project of making undies out of old t-shirts that I never got into.  I made the plain black elastic you see on the bottom.


Recently I hit up the local fabric store with a few friends and we searched out the most fun elastic we could find.  I was drawn to the ruffles. You see, I wear these elastics on my wrist all the time.  I have long hair and am always in need of an elastic to get it out of my face when I am cooking or dealing with kids, or whatever.  I thought the ruffles would look pretty cute on my wrist as well as my hair.


How to make them:

1. Buy a length of light elastic. Most of the ones we saw were about $0.45/yard.
2. Cut the elastic to lengths you need, plus an inch on either side to account for the knot. Mine are about 8.5 inches.
3. Tie a loop knot and leave a little on the ends - a makeshift bow.
4. Run a lighter flame quickly along the edges of the ends.  This melts the fabric around the elastic and prevents fraying.
5. Pile on your wrist or put up your hair.  Enjoy!

Join us for a handmade summer!


A Theme for June

I follow Sew Caroline on Instagram.  Funny - I never thought to look at her website.  I just did now as I made the hyperlink.  I love getting to know people through their photos, but now I have a whole website to explore.  Anyway, she posted a challenge for the month of June.  I'm always up for a challenge and this one is a combo of photos and handmade! Join us...


Sunday, May 26, 2013

Pacific Heights Crab Shack

I have been craving crab for the last three months.  Crab dipped in warm garlic butter....yum...  The last time we had crab was four years ago, fresh off the dock in Tofino, BC.  We cooked it up in our beachside cabin.  It was divine.  So you can see, not just any crab would do.

Then recently a new friend/neighbour had been posting on Facebook about the fish and crab her husband had been catching locally.  I remembered back to last summer when we saw guys plucking crab out of the ocean at Centennial Beach - maybe it was possible for us to do it too.  Serendipity brought it all together when the local homeschooling community posted about the lowest tides of the year happening Sunday at 2pm.  Perfect.

I bought an ocean fishing license online and read all the rules of crabbing.  We were only allowed to bring home 4 crab per license.  They had to be male and over 6.5 inches wide across the back shell.  My friend's husband told us all about baiting crab traps and nets and stuff, but we are ghetto fishermen so we brought BBQ tongs and a bucket.

We hit the somewhat rainy beach today with our 'gear' and a few friends who wanted to witness the craziness we had got ourselves into.  There was a big hike out to the ocean.  The tide had gone out REALLY far.  Once we hit the ocean we saw a few other guys with nets so we knew we were on the right track.  We went in up to our knees and wandered the shoreline.  It didn't take long until we found our first one.


Sadly, he was only 6 inches across and he had to go back. 

Our second one was huge!  The biggest one of the day.  He sure was feisty.  We had to watch Annie's nose.  She really wanted to protect us from the scary beast.


We started a crab fight.


It was great fun.  We caught three.  A kind fellow fisherman who had reached his limit gave us two - one of which was a tad too small, but we were only allowed to take four anyway.

photo care of Angela D'Eon 2013

We were just blown away at how easy it was.  No special gear was needed.  You can see our bucket and tongs above.  Yes, a net would have been nice, but we did great without it.  We caught our own dinner!  Can you believe it?  I am still in shock.  Pluck some crabs out of the ocean.  Done.

Here is our final catch...


And then it was time for cooking...


And fifteen minutes later....done!


I think the hardest part is taking out all the sweet meat.  Luckily I have a husband that doesn't mind getting his hands dirty.


This is what two crabs worth of meat looks like.


Sorry there aren't any more photos of food.  We dipped it in garlic butter and ate it.  The end.

But we couldn't eat it all.  And there is two more crabs left!  Tomorrow there will be crab cakes and the day after that there will be grilled cheese sandwiches with crab.  Oh my.  Yes.

Wednesday, May 01, 2013

Respect Your Elders

Even though we are on our way out of cold season, it is time to start planning for the next bout of illness. One of my favourite cold remedies is Elder.  Elderflowers and elderberries can be used in teas, tinctures, honeys, and syrups.  Right now is the perfect time to gather the flowers.  You probably have seen them all around you and never knew what they were.  Tiny white blossom bursts in a cone-shaped formation on large bushy trees.  They seem to line the highways and roadways.  They are sun seekers - you will not find them deep in the forest. They always seem to pop out the same time as the cherry blossoms, but don't get the same fanfare, except from me.  I get so excited when I see the first cones.  It is time to make medicine!


Do you see the white cones above?  Here is a close-up:


Snip off the blossoms, just below the cone.  You don't need the leaves.  Fill a jar:


Bring it home and admire the loveliness while you decide how you want to proceed...


I have made honeys, tinctures, teas and syrups.  They all are great in their own ways.  Honeys and syrups are sweet and therefore are easy for kids to take.  Dried blossoms for teas are nice to have on hand for when you want something warm.  Tinctures are quick and simple for adults in need of a remedy. But liqueurs are the nicest way to take your medicine.  I have found that when I am feeling run down and need something special to lift my spirits and my immune system, there is nothing like a small cup of elderberry/elderflower liqueur on ice to warm your insides and banish the bugs.

The process for tinctures and liqueurs starts out the same.  Fill a jar with blossoms (or berries), and cover with vodka.  Any vodka will do.  Let it sit for 6 weeks to allow the alcohol time to draw out the medicinal properties.  Shake jar every week to ensure that all surfaces have been touched.  After the six weeks (or longer) strain out the blossoms and squeeze out any excess liquid.  You now have a tincture. If you want to make a liqueur you can add sugar or honey.  Honey adds additional medicinal properties - local honey is even better!

I happened to have some berries left from last summer hanging out in my freezer.  You see, the easiest way to remove the berries from the toxic stems is to freeze them in a bag and then smash the bag around and the berries release from the stems.  


These are blue and black elderberries.  The blossoms shown above produce a red berry.  The red berries are not as sweet and palatable as the black and blue - but the blossoms are just fine for this project.  I want to let as many flowers turn to black and blue berries - I can't waste my secret stash!

I followed the same process with the berries - covered them with vodka (supervised by Chief of Quality Control - Mr. Simon).


Now all three jars are ready to be tucked into a cool dark cabinet for the next two months.  The berries seemed to have settled, didn't they?


Try your hand at other liqueurs...blackberry is another favourite around here!

Also....Happy May Day!  My little helper and I had such a great time in the sun, breathing the fresh floral air and snipping the cones.  I think gathering elderflowers is going to be my new May Day tradition.


Saturday, April 27, 2013

Last Minute Knitting

I am on a race against time to get ready for an upcoming vacation.  I took on a last minute project for a lovely cousin-in-law that we will be visiting - it will be her birthday.  I needed to make something light, as she lives in a warm climate.  I was leaning towards lace in a natural fibre.  I searched online through all sorts of patterns.  I saw a few that I liked but none were perfect.  The amount of patterns was overwhelming so I gave up and headed to Three Bags Full to find some lace yarn in hopes that I would be inspired there.  I was lucky to love the first skein I picked up and just below the display was a sample shawl knit out of the same yarn.  It was exactly what I had pictured in my mind.  Even more lucky - the pattern was free on Ravelry!  Sold!

This Malabrigo yarn is beyond soft.  Silk and baby alpaca make a divine combination.  The colour is amazing, too.  I was looking for a light grey, but this yarn has subtle undertones of pink, purple, blue and green - kind of like the inside of an oyster shell.  The silk content gives it a bit of a gloss, also like the inside of an oyster shell.


The knitting was easy - it is a very simple pattern.  The lightweight, soft yarn was gentle on the hands. I had to make sure to do the lace parts at night or when the kids were away so that I could count out the lace.  I did make a couple mistakes, but I don't think that the average eye will catch them.  I love knitting lace because it is so magical.  You follow the instructions and you end up with the crumpled mess below.


Then you stretch it out with a million little pins and wires...


And you are left with a most beautiful spiderweb.


I loved it so much that I bought a second skein of the exact same yarn to make the exact same shawl for myself.  It is so light and soft and luxurious - everyone needs one.

I had also signed up to do a kids clothes sewing challenge this week, but this shawl took over my days.  I needed to get it done on time!  I completed two days of the sewing challenge (Monday and Tuesday) and then fell off the wagon.  Tomorrow is the last day of the challenge and I hope to finish at least one of the projects I started.  I'll let you know...

Edited to add:  No sewing happened.  Oh well, there are only so many hours in a day and small children are calling...

Tulip Trip

Last weekend we drove to Mount Vernon, Wa to see the famous tulip festival.  It was as amazing as everyone had said, and despite the intermittent rain showers we all were blown away.  These are some of my favourite photos from the excursion...


I bought a new digital camera (Canon) over a year ago but I have been too scared to take it anywhere.  I knew it would be worth it, so I brought it with us on this trip.  I fell in love.

Wednesday, April 10, 2013

Lotions and Potions

Three years ago I took an herbal medicine course with Garliq at his Urban Herb School.  I spent eight months (two classes a month) foraging for plants, roots, flowers and berries and then making them into teas, tinctures and salves.  I re-learned the skills that my Austrian Oma had but didn't get the chance to teach me.  I now have a cupboard full of tinctures and oils that can cure most everyday ailments.  We have a few family favourites, and I will share those as we move through the seasons.  It is almost elderflower time!

Recently I Spring-cleaned my cupboards and I came across a few bottles of magic that needed processing.  I found a jar of calendula soaking in almond oil and a bottle of St. John's Wort also in almond oil.  I had forgotten about these, but luckily they hadn't gone 'off'.  I think it was the cool, dark cupboard and the vitamin E oil on top that preserved the medicinal oils.  I left them on my counter to remind me to play with them and yesterday was the perfect rainy afternoon to putter in the kitchen.


The calendula oil was slated to become a cream.  The calendula I grew in my garden (that's my urban calendula garden above).  Some of the original flowers came from seeds that Garliq shared with us from his community garden.  I pick the flowers from Spring to Fall and let them dry in a paper bag - shaking them every once in awhile to ensure they dry evenly.  I don't pick all the flowers, though, as I like to collect seeds at the end of the summer.  Some of the seeds get thrown back under the flowers to ensure a hearty harvest.

I haven't had any luck with making medicinal oils using fresh ingredients.  The moisture in the leaves and flowers can make your oils rancid.  I have had many jars bubble up and smell just nasty.  But I learned from my mistakes and now use only dried flowers, and I haven't had any turn rancid since.  Fill a jar with your blossoms and then cover with oil (make sure that no little bits are sticking outside of the top of the oil as this can also lead to rancidity).  At the school we used olive oil, but I found that the olive colour and smell take over the delicate floral nuances, so I switched to a light almond oil.  If you are in a rush, you can cook the oil with the flowers right away, but I prefer letting them slowly steep on a window sill for about six weeks.  The calendula oil I found in my cupboard had been there for about 8 months.


In the past I have used Rosemary Gladstar's recipe for creams.  It is a great recipe but I wanted to try something new and was inspired by recently meeting the lovely Leona from My Healthy Green Family and decided to give her recipe a try.  It works so well, and she describes the process much better than Rosemary.  I made a few amendments because I was making a calendula cream, but essentially the process is the same.  My strained and measured calendula oil went into a pot with the measured beeswax.  Once the beeswax had melted I poured the mixture into my blender with a few drops of vitamin E oil and rose oil for added scent.  As it cooled to room temperature, I boiled some water and dried calendula on the stove and then let it steep into a lovely infusion.  This infusion was strained and allowed to cool to room temperature as well.  Then it is time for magic!  Start up your blender with the oil in it on a low setting and pour the infusion in a slow steady stream into the middle of the whirring oil.  In a few seconds it creates an emulsion and you have cream!  If you have ever made mayonnaise, you will have see the same reaction.  Keep pouring and blending until the infusion is all gone.  I then scraped down the sides of the blender to make sure all the goodness was incorporated.  Blend a few seconds more and it is all done.  Pour into glass jars. I keep one small jar in the bathroom for regular use and keep the rest in the fridge because there are no preservatives like in store bought creams. Refill small jar as necessary.


So far, I really like My Healthy Green Family's recipe.  The texture is more like a traditional cold cream than a lotion.  It absorbs well on my hands.  I forgot to try it on my face this morning - will do tomorrow.  Next time I think I'll add more than ten drops of rose oil.  I like my cream to have some scent - a small luxury.  This calendula cream will have many uses - it is a healing cream, with anti-viral and anti-inflammatory properties.  I can be used on rashes and bumps and bruises.  I am excited to have it in my medicine chest for emergencies and for daily use of dry skin.

My second project was to make use of the St. John's Wort oil that was also lingering in my cupboard.  The St. John's Wort blossoms were collected on a remote road on the way up to Rock Candy Mine near Grand Forks in the summer of 2011. The long forested road was lined with tons of these tiny yellow flowers.  It was so beautiful - I couldn't resist to bring a few home.  Did you know that these little yellow flowers have a secret?  They may look bright yellow, but are actually red inside!  So if you make a tincture, tea or oil, the result will be pinkish-red.  We all know that St. John's Wort is commonly used to treat depression.  A tincture is great to banish the blues. But those sunny yellow flowers can not only help make you smile, they can also relax your muscles and sooth burns - which I find kind of funny because the medical community tells us that St. John's Wort can make you more sensitive to the sun. If you subscribe to homeopathic thinking then you will know that like treats like; and therefore something that would make you more sensitive to sunlight would also treat the adverse effects of that sunlight.  St. John's Wort also has anti-bacterial, anti-fungal and anti-inflammatory properties - perfect for burns and rashes.

I didn't use a recipe for the St. John's Wort salve.  A salve is simply an oil mixed with beeswax.  The beeswax gives the oil some structure so that it is easier to handle.  The amount of beeswax used depends on how hard you want you salve to be.  I strained the blossoms out of the oil and put it in a pot on the stove.  There was probably a cup and a half of pink oil - I wish I took a picture so that you could see the amazing colour.   I added 1.5 oz of beeswax to the pot and let them melt together.  I did a test (take a spoon and dip it in the warm mixture and put it in the freezer for a few seconds) to see if it was the consistency I wanted - I didn't want a solid rock; I wanted it soft, but not runny.  It was perfect.  Pour into glass jars and allow to harden.  The end.


You can see the pink tinge in the photo above.  So pretty and smells great on it's own.  Let's hope it works!  California is calling us and we may be in need of the sunburn salve in the near future.

Wednesday, April 03, 2013

Spinning into Spring

I'm back!

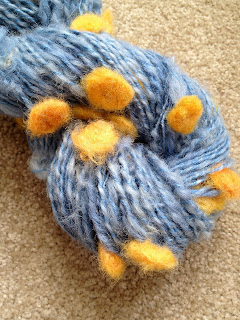
The Spring sunshine and making some new crafty friends has really boosted my creative energy.  I've been sewing a lot lately. Banners, pjs, hats and other odds and ends. Knitting has taken a back seat for a little while.  I started a pair of trilobite-patterned socks that really hurt my hand to knit.  I'm almost finished the first sock, but I am not motivated to start the second.  I need something more mindless than counting and knitting a complicated pattern. I need some instant gratification - hence the sewing.  Another of my favourite instant gratification projects is spinning wool.  Spinning is very mindless and meditative.  I was gifted a bag of cornflower blue and dandelion yellow locks that were staring me down so I decided it was time to play with them.  I hand-fluffed the blue locks and roughly spun them into singles.
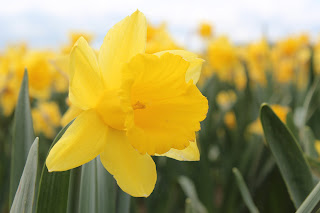

Next, I needle felted the yellow locks into small circles - little dandelions!


The needle felted flowers were then threaded onto short lengths of the blue singles.


Simon decided that they looked like eggs that needed hatching. You gotta love the furry friend helpers...


I plyed with a thin blue thread and added the threaded flowers at random times.  Spun all together, I think it looks like blue sky and bright yellow dandelions.  Pure Spring!


I think it is going to make a great hat.  I also think I need to spin some greens and browns to make a grass like band for the hat that will be overflowing with dandelions. What do you think?